If you want to develop an image classification algorithm with your collected images, you may have several questions: how can I create labels for the images; how can I ensure that all the images have the same size to fit the algorithm; what should I do if I have not enough images. Don’t worry; there is a pair of methods in TensorFlow and Keras can help you solve them easily. After reading this article you will know how to: label the images just with the right folder name; apply data augmentation on the fly; split train and validation.
Before we go through the code, make sure you have the following libs installed:
- Numpy
- Pillow
- Matplotlib
- TensorFlow 2(2.3.1 was used)
import os
import pathlib
import PIL

import numpy as np
import tensorflow as tf
import matplotlib.pyplot as plt
from tensorflow.keras import layers
from tensorflow.keras.preprocessing.image import ImageDataGenerator
In this article, we will use a small image dataset to classify fruit as a demo. You can download it from Microsoft Learn: https://aka.ms/fruit-images. The images should be extracted in a folder called: training-images. In this folder, you can find 3 subfolders for each fruit image. With the following code, you can get 45 out which is the total number of images.
image_folder = 'YOURPATH/training-images'
data_dir = pathlib.Path(image_folder)
image_count = len(list(data_dir.glob('*/*.jpg')))
print(image_count)
Let’s also check the size of one of the original images. The out will be (1024, 768).
apples = list(data_dir.glob('apple/*'))
apple = PIL.Image.open(str(apples[1]))
print(apple.size)
Create an image dataset from a directory
With image_dataset_from_directory function from Keras, we can simply generate the labels from the names of subfolders. If you are using your own images. The folder structure should look somehow like our demo.
Note: supported image formats: jpeg, png, bmp, gif. Animated gifs are truncated to the first frame.
training-images/
    apple/
        IMG_20200229_164759.jpg
        IMG_20200229_164760.jpg
        IMG_20200229_164804.jpg
        IMG_20200229_164811.jpg
		...
    banana/
        IMG_20200229_164947.jpg
        IMG_20200229_164952.jpg
        IMG_20200229_164957.jpg
        IMG_20200229_164958.jpg
		...
    orange/
        IMG_20200229_165108.jpg
        IMG_20200229_165112.jpg
        IMG_20200229_165115.jpg
        IMG_20200229_165126.jpg
		...
The calling of image_dataset_from_directory will return a tf.data.Dataset. We can set the target size and batch size of our model input. With a random seed, we can have the same shuffling and transformations if we run this code next time. The output of the following code will be: Found 45 files belonging to 3 classes.
batch_size = 9
img_height = 180
img_width = 180
train_ds = tf.keras.preprocessing.image_dataset_from_directory(
    data_dir,
    seed=123,
    image_size=(img_height, img_width),
    batch_size=batch_size)
The class names will be the subfolder names. You can find the class names in the class_names attribute on these datasets. Your output will be: ['apple', 'banana', 'orange']
class_names = train_ds.class_names
print(class_names)
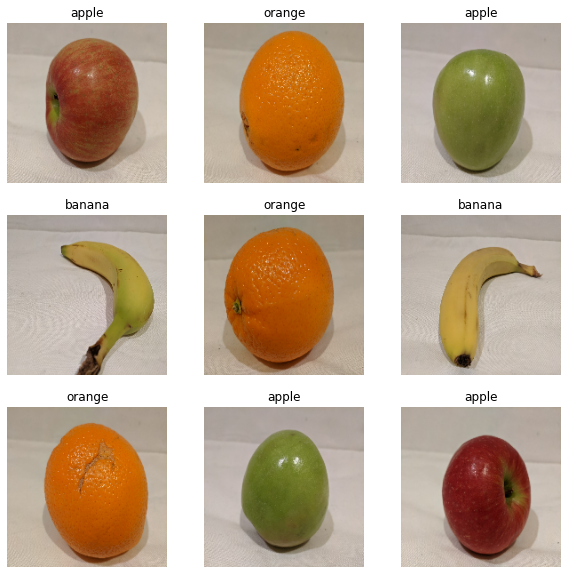
Let’s plot the first 9 images of our dataset.
plt.figure(figsize=(10, 10))
for images, labels in train_ds.take(1):
    for i in range(9):
        ax = plt.subplot(3, 3, i + 1)
        plt.imshow(images[i].numpy().astype("uint8"))
        plt.title(class_names[labels[i]])
        plt.axis("off")
You can train a model using these datasets by passing them to model.fit (shown later in this tutorial). If you like, you can also manually iterate over the dataset and retrieve batches of images. The output of the following code will be: (9, 180, 180, 3)and (9,). From the shape of labels, we can see that the labels are not one-hot encoded.
for image_batch, labels_batch in train_ds:
    print(image_batch.shape)
    print(labels_batch.shape)
    break
Before we fit the dataset into the model, we can normalize it with the following code. Or we just add this layer as our first layer in the model.
# normalization in the outside of model

normalization_layer = tf.keras.layers.experimental.preprocessing.Rescaling(1./255)
normalized_ds = train_ds.map(lambda x, y: (normalization_layer(x), y))
We will build a small convolutional neural network with one convolutional layer.
num_classes = 3

model = tf.keras.Sequential([
  layers.experimental.preprocessing.Rescaling(1./255),
  layers.Conv2D(32, 3, activation='relu'),
  layers.MaxPooling2D(),
  layers.Flatten(),
  layers.Dense(128, activation='relu'),
  layers.Dense(num_classes),
  layers.Activation('softmax')
])
Notice that our labels are not encoded, so we will use sparse_categorical_crossentropy loss instead of a normal categorical_crossentropy.
model.compile(
    optimizer='adam',
    loss = "sparse_categorical_crossentropy",
    metrics=['accuracy'])
Now your model is ready to train!
model.fit(
    train_ds,
    epochs=10
)
Apply Data Augmentation on the Fly
Data augmentation is a very important technology to improve the generalizability of machine learning models, especially when there are not so much data available for training a robust model. The class ImageDataGenerator of Keras will help you apply data augmentation while you import your images. The output of ImageDataGenerator is batches of tensor image data with real-time augmentation. There is a lot of data augmentation we can use in ImageDataGenerator . In this example, we apply rotation, shift, shear, zoom, and horizontal flip. More information can be found in this document: Image data preprocessing (keras.io). We can also finish the normalization step here with rescale. But we want to first visualize the image without scaling.
train_datagen = ImageDataGenerator(
    #rescale=1/255,
    rotation_range=40,
    width_shift_range=0.2,
    height_shift_range=0.2,
    shear_range=0.2,
    zoom_range=0.2,
    horizontal_flip=True,
    fill_mode='nearest')
After setting the parameter of data augmentation, we use flow_from_directory to connect with our image folder. It is very similar to image_dataset_from_directory function. However, we need to set the class_mode to 'categorical'. The output will be: Found 45 images belonging to 3 classes.
train_generator = train_datagen.flow_from_directory(
    data_dir,  # This is the source directory for training images
    target_size=(img_height, img_width),
    seed=123,
    batch_size=batch_size,
    class_mode='categorical')
Let’s check the shapes of our input images and labels. The image batch will have a shape: (9, 180, 180, 3). However, the shape of the labels is (9, 3), it is one-hot encoded!
images, labels = train_generator.next()
for i in range(9):
    print(images.shape)
    print(labels.shape)
    break
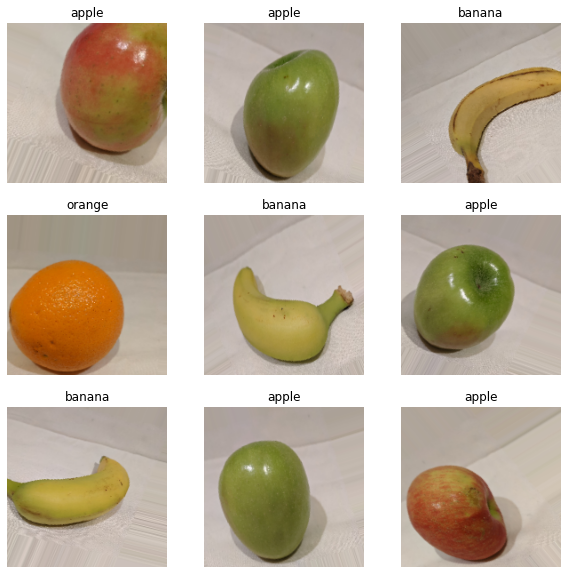
From the first 9 images of our train_generator we can see that the fruits are not in the center of the image anymore.
plt.figure(figsize=(10, 10))
for i in range(9):
    ax = plt.subplot(3, 3, i + 1)
    plt.imshow(images[i].astype("uint8"))
    plt.title(class_names[np.argmax(labels[i])])
    plt.axis("off")
Now, let’s do the data augmentation with normalization to fit the neural network.
train_datagen = ImageDataGenerator(
    rescale=1/255,
    rotation_range=40,
    width_shift_range=0.2,
    height_shift_range=0.2,
    shear_range=0.2,
    zoom_range=0.2,
    horizontal_flip=True,
    fill_mode='nearest')
train_generator = train_datagen.flow_from_directory(
    data_dir,
    target_size=(img_height, img_width),
    seed=123,
    batch_size=batch_size,
    class_mode='categorical')

num_classes = 3
model = tf.keras.Sequential([
    layers.Conv2D(32, 3, activation='relu'),
    layers.MaxPooling2D(),
    layers.Flatten(),
    layers.Dense(128, activation='relu'),
    layers.Dense(num_classes),
    layers.Activation('softmax')])
Here we can use categorical_crossentropy as the loss function. To use a generator as input we need to set the steps_per_epoch parameter. We have 45 images and the size of our batch is 9, so here we set the number of steps 5.
model.compile(
    optimizer='adam',
    loss='categorical_crossentropy',
    metrics=['accuracy'])
model.fit(
    train_generator,
    steps_per_epoch=5,
    epochs=10)
Split Train and Validation Set
A validation set is applied to help data scientists to find the best hyperparameter setting and evaluate the performance of a model in the training phase. The data partitioning can be done manually. You can save images in two directories. Your folder structure will look like below. Then you can use image_dataset_from_directory or ImageDataGenerator for both train and validation folders.
training-images/
    apple/
        IMG_20200229_164759.jpg
        IMG_20200229_164760.jpg
		...
    banana/
        IMG_20200229_164947.jpg
        IMG_20200229_164952.jpg
		...
    orange/
        IMG_20200229_165108.jpg
        IMG_20200229_165112.jpg
		...
validation_images/
	apple/
		IMG_20200229_164804.jpg
        IMG_20200229_164811.jpg
        ...
    banana/
    	IMG_20200229_164957.jpg
        IMG_20200229_164958.jpg
        ...
    orange/
        IMG_20200229_165115.jpg
        IMG_20200229_165126.jpg
        ...
It can also be easily done with a small change of our code. What we need to set extra are two arguments: validation_split and subset. The example of using image_dataset_from_directory for data partitioning is shown below. The validation_split is 0.2, which means that the 20% data will be split for validation.
train_ds = tf.keras.preprocessing.image_dataset_from_directory(
    data_dir,
    seed=123,
    image_size=(img_height, img_width),
    batch_size=batch_size,
    validation_split=0.2,
    subset='training')

valid_ds = tf.keras.preprocessing.image_dataset_from_directory(
    data_dir,
    seed=123,
    image_size=(img_height, img_width),
    batch_size=batch_size,
    validation_split=0.2,
    subset='validation')
It is similar toImageDataGenerator. But the data augmentation setting can also be defined differently. Some people want to remove all data augmentation for the validation set to keep the validation data real.
train_datagen = ImageDataGenerator(
    rescale=1/255,
    rotation_range=40,
    width_shift_range=0.2,
    height_shift_range=0.2,
    shear_range=0.2,
    zoom_range=0.2,
    horizontal_flip=True,
    fill_mode='nearest',
    validation_split=0.2)
train_generator = train_datagen.flow_from_directory(
    data_dir,
    target_size=(img_height, img_width),
    seed=123,
    batch_size=batch_size,
    subset = 'training',
    class_mode='categorical')

val_datagen = ImageDataGenerator(
    rescale=1/255,
    validation_split=0.2)
val_generator = val_datagen.flow_from_directory(
    data_dir,
    target_size=(img_height, img_width),
    seed=123,
    batch_size=batch_size,
    subset = 'validation',
    class_mode='categorical')
We can use the same CNN model as above, it can now be trained as follow.
model.fit(
    train_generator,
    steps_per_epoch=4,
    validation_data=val_generator,
    validation_steps=1,
    epochs=10)
Hope this article can help you to create image datasets with TensorFlow and Keras. You can find more information about TensorFlow dataset in the references.